Shop

6 Ways to Clean Up Your Act in 2013

Is 2013 the year you resolved to keep your house tidy? With planning, a bit of extra effort and these six tips to start you off, you can succeed where your 2012 diet failed. 1. Start with a clean slate. Get a leg up on your new cleaning regiment by bringing in professionals to tackle major jobs, like cleaning the stove or scrubbing floors. Once your home is spic and span, make it your resolution to keep it that way. 2. Make a cleaning plan. The best resolutions have clear, concise goals and a timeline to accomplish them. Check out the 2013 New Year’s Cleaning Grand Plan Challenge, a 14-week program by the Organized Home web blog, for a step-by-step schedule, as well as cleaning tips and tricks. 3. Invest in tools to make cleaning easier. Often, it’s the simple things that help keep a space clean: a cover for the microwave, baking soda for the fridge, automatic cleaners for toilet and shower. And let’s not forget that industrious robotic helper, the Roomba. It cleans your floors while you’re away, then recharges itself automatically. 4. Clear that clutter. The post-Christmas season is a good time to take stock of your living space. Has paperwork taken over your desk? File it away. Ages-old condiments in the fridge? Toss ’em. Invest in storage containers to put away odds and ends. 5. Tackle cleaning one chore at a time. With any New Year’s resolution, the quickest route to failure is to tackle too much at once. Resolve to set aside just fifteen minutes per day to clean your home, focusing on one room at a time. 6. Reward yourself for a job well done. Resolve to treat yourself whenever you reach a milestone on your cleaning plan. A new flat-screen TV would look great mounted of the wall of your squeaky clean living room.

The Five Scariest Cleaning Jobs in Your House

There’s nothing Hollywood loves more than a creepy “home-alone” horror movie, with potential danger lurking behind every corner. In real life, these often-neglected corners of your house could be hiding some very scary surprises. 1. Attic or crawlspace These storage spaces can attract real-life creepy crawlies, from pests to mold and mildew, which can damage your home and cause health problems if left unchecked. You should examine your attic or crawlspace every six months, looking for droppings, nesting materials or other signs of pests. If you find evidence of an infestation, call an exterminator immediately. You should also be on the lookout for dampness or foul odours, which can signal that water is getting in to the house. Be sure to wear a face mask when cleaning the space, especially if you have exposed insulation. If you’re using the attic or crawlspace to store items, be sure to put them in airtight plastic or rubber containers. 2. Under furniture Who knows what horrors lurk beneath the Chesterfield? Seriously, though, dust and pet hair accumulating under furniture can be a real nightmare for allergy sufferers. To clean under furniture on hardwood floors or linoleum, use an extension handle duster (the kind made for sweeping the tops of ceiling fans). Carpeted rooms require a bit more work. If you’re going to move the furniture out, consider giving the whole space a good steam cleaning – will keep you from having to perform this unpleasant chore again for some time. 3. The closet If I’ve learned anything from horror movies, it’s that closets usually contain one of three things: a monster, an axe murderer or clutter – and most people would rather deal with the first two. The key to organizing a closet is to divide and conquer. Take everything out of the closet and divide it into three categories: keep, dump or donate. Be ruthless; dump anything that’s damaged and donate anything you haven’t worn in a year or longer, doesn’t fit you or no longer suits your style. Once your closet is uncluttered, plan to keep it that way: install double rods and shelves to increase your storage capacity, store small items in containers and use the back of the door for a hanging shoe organizer. 4. The Fridge Scarier than the Blob, a dirty refrigerator is a potential breeding ground for bacteria and food-borne pathogens. And like the Blob, you should tackle this chore before it becomes too big to handle – about once a month. Clear your shelves, making sure to toss anything that’s spoiled or expired. If possible, remove the shelves and drawers from the fridge. Wipe down the shelves, drawers and the interior with a solution of two tablespoons of baking soda to one quart of hot water (avoid chemical cleaners, which can leave behind a scent that can be absorbed by the food.) You can place a tray of baking soda or cat litter in the fridge to eliminate lingering odours. Once a season, you should also unplug your fridge and vacuum the coils at the back of the fridge. 5. The Shower Psycho, anyone? You likely won’t meet a grisly end in the bathroom (as long as you have non-slip mats, of course). But it’s difficult to stay clean when your shower is dirtier than you are. Over time, your shower head can accumulate mineral deposits that will block the flow of water. To clean your shower head, immerse it in a pot of distilled white vinegar, then heat the pot on medium-low heat and rinse. Scrub down your shower walls with a mildew-busting solution of 1/2 cup vinegar, 1 cup ammonia, 1/4 baking soda and 3 litres of hot water. Wipe down glass shower doors clean with white vinegar for a crystal clear clean. Most shower curtains can be tossed in the washing machine; add half a load’s worth of detergent and 1/2 cup of baking soda during the wash cycle, then 1/2 cup of vinegar during the rinse cycle. Hang to dry.

Six Ways to Prepare Your Home for Winter

 
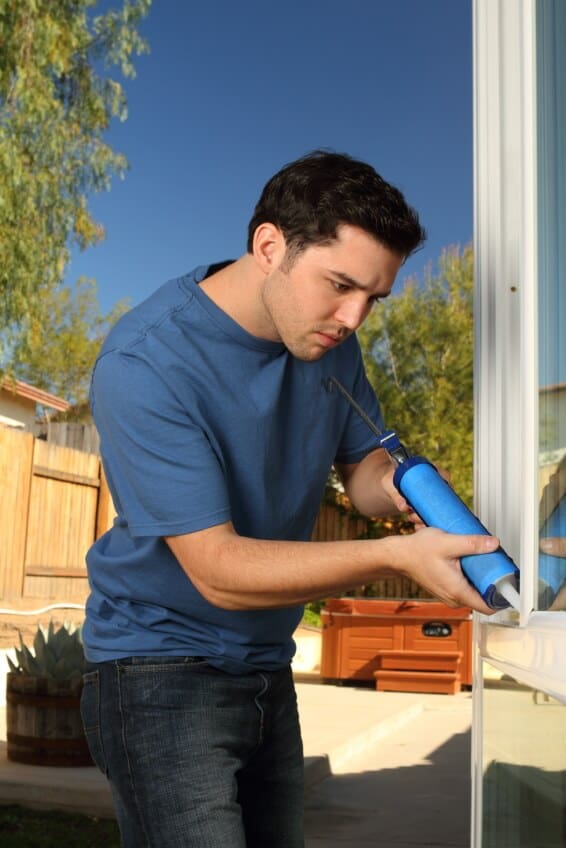
Caulk your window frames inside and out and weatherstrip around doors to prevent leaks. (istockphoto.com)
  If you thought last year’s mild winter was the new norm, think again. While Canada posted the third warmest winter on record in 2011-2012, meteorologists with AccuWeather are predicting a healthy dose of snow and cold across the nation this season. Alberta and British Columbia, in particular, are expected to experience colder and drier conditions than usual. But homeowners need not fear; by winterizing areas in and around the house, you can easily keep Jack Frost’s icy grip at bay. Gold Star Cleaning offers these six tips to get your started. 1. The Furnace and fireplace Preparing your home’s heating system for winter won’t just save you money on your heating bills – it could also save your life. A build-up of dust or debris over the summer months can turn your furnace or fireplace into a potential fire hazard, so it’s important to make sure they’re functioning properly. Here’s a quick to-do checklist: -Have your furnace inspected annually by a qualified HVAC technician. Have your ducts cleaned every three years. -Clean or replace your furnace’s air filter. -Clean your vents, and ensure that vents are not obstructed by furniture or debris. -Have your chimney cleaned, and cap the top of your chimney. -Remove any flammable objects from around your furnace and fireplace. Star tip: remove glass from gas fireplaces with a screwdriver, lay flat on a drop sheet and wipe away stubborn mineral deposits using a gas fireplace glass cleaner. 2. Smoke and carbon monoxide detectors While we’re on the topic of fire safety, now is a good time to ensure you have a working fire detector in your home, as required by law (the Office of the Fire Commissioner of British Columbia has a break-down of the new requirements for smoke detectors in private dwellings, which have been in place since 2010). If your smoke detector is battery-powered, replace the batteries in your smoke detector and test it. Replace smoke detectors every ten years. If you haven’t yet installed a lifesaving carbon monoxide detector in your home, get one. 3. Doors and windows Keep the warm air in your home by identifying and sealing leaks. An easy way to find leaks is by holding a candle near the edges of a window or door frame; if the flame flickers or goes out, you have a leak. Caulk your window frames inside and out and weatherstrip around doors. Remove your summer screens and install storm windows (or use good ol’ fashioned shrink wrap). 4. Roof, gutters and downspouts Take it from me – you don’t want to be climbing on your roof in the dead of winter to fix a leak. Take the time now to replace any damaged roof shingles or tiles, clear out of your gutters and install leaf guards. If necessary, add piping to your downspout so that it transports water at least 10 feet away from your home. If your home has an attic, add additional insulation to keep warm air from escaping and forming condensation or ice dams in your home. 5. Pipes and Plumbing A burst pipe  can cause untold damage to your home. Avoid this potential catastrophe by targeting pipes where water is likely to freeze. Turn off the water to your hose bibs via the shutoff valve inside your home. Look for exposed pipes in your house – likely locations include crawlspaces, basements or garages – and wrap them with foam rubber sleeves or fibreglass insulation. If you’re going away for the holidays, keep the temperature in your home above 50 degrees Fahrenheit (10 degrees Celsius) to reduce the risk of freezing. Star tip: Check that sump pumps are working and ready for the spring thaw.  If you do have flooding problems later on  a cleaning company that does restoration cleaning is a number you will want to have on hand. 6. The Great Outdoors Spring may seem like a distant memory, but that’s no reason to neglect your yard. Trim any tree branches hanging close to your house or near electrical wires. Protect garden tools and outdoor appliances by cleaning and storing them. Drain your garden hose. Remove the gas from your lawnmower – and while you’re at it, fill up the tank in your snowblower and test it. Finally, make sure you’re prepared for the inevitable snowfall with a sturdy shovel and bags of sand or salt. Star tip: Insist that people remove their shoes at the door and keep a rubber boot tray at each one to prevent the outdoors coming indoors.

How to remove grass stains from clothing

It’s summer, the sun is out and it’s time to send your kids outside for an outdoors adventure. Don’t worry what state their clothes will come back in – Goldstar Cleaning Services’ guide to removing grass stains from clothing will stop you spending your whole summer doing laundry. 1. Soak Try to keep the grass stain wet until you have the materials and time to clean it. Heat will ‘seal’ the grass stain and may halt any chance of removing it completely, so make sure you inspect the clothing after washing before you hang it out in the sun or stick it in the dryer. If the grass stain is still visible, soak and consider dropping it off at Goldstar Cleaning Services Drycleaning Depot at 1591 10th Ave, Fernie for treatment by Prestige Dry Cleaning. 2. Common household stain busters Apply rubbing alcohol to the grass stain to try to loosen it, leave for 15 minutes then wash with your usual  detergent. You can also apply a paste of equal parts baking soda and vinegar and rub into the fabric with your fingers – the fizzing action should help loosen the grass stain. 3. A sweet way to clean leather shoes Believe it or not, molasses will ‘draw out’ grass stains on your white leather running shoes (or any leather item). Massage a good dollop into the leather, leave overnight and wash the shoes with warm water and a gentle soap. 4. Prevention will save a lot of scrubbing Let kids be kids without worrying about how you will remove the grass stains, and send them out to play soccer in clothes that won’t cause you a lot of extra laundry. Grass stains are less likely to stain manmade fabrics than natural fibres such as cotton, and dark colours show the stains less than light. 5. Know when to hand it over to the professionals Goldstar Cleaning Services is a depot for Prestige Dry Cleaning – drop off and pick up items at 1591 10th Ave, Fernie. You need to get grass stains professionally dry cleaned if: • You have tried one of the stain removers above, washed it as normal and the stain is still there. • The item is fragile or is marked dry clean only. Get it checked professionally as soon as possible after the stain is caused – the longer you wait, the more likely the stain will not be removable.

How to keep your barbecue clean so it’s always ready for your next party

 A barbecue is the perfect way to enjoy a summer evening – don’t let your smoky, unclean grill drive your friends and family off the deck and into the house. Follow Goldstar Cleaning Services’ tips on keeping your grill clean so that it’s always ready for your next party. 1. Get the right cleaning tools – and use them It’s easier to clean off the grill while it’s still hot, and before all the little bits of meat have burned and dried on it, potentially causing foul odours next time you grill. In mountain towns like Fernie, Sparwood and Elkford the smell of food on barbecues can attract bears into your neighbourhood, so it’s particularly important to get them clean. The most effective cleaning tool is simply a stiff wire brush to clean down the grill each time you use it. A long-handled brush will make it easier to get into all the nooks and crannies without risking burning yourself. Replace it every year to stop the wire bristles getting blunt and bent out of shape, making it less effective at cleaning.   2. Steam clean If you forgot to brush down the grill after your last barbecue, or if you’re only just getting into the habit of cleaning it, chances are your grate has some pretty heavy-duty burned-on food waste that may even be causing foul odours or smoke. To loosen off the debris, take a scrunched-up newspaper, soak it in water and put it on the grill over a low flame for around 20 minutes, with the lid closed. Keep a close eye on it to make sure it doesn’t stay on so long that all the water evaporates.
This will loosen off all the burned-on food, allowing you to clean it as above.
  3. Oven cleaner A chemical oven cleaner can also be used to loosen food scraps. Take off the cold grate and lay it on some sheets of newspaper, then spray with the oven cleaner, making sure to stand upwind so you don’t breath in the fumes, and use gloves to prevent skin irritation. Leave for 5-10 minutes and then use a wire brush to clean.   4. Inside the barbecue If you use lava rocks or ceramic stones, take them out and soak in a bucket of water with a squirt of dish soap to loosen off any grease drips or food scraps. Use an all purpose kitchen cleaner and wipe the bottom of the grill clean, being careful with any gas outlets. Replace rocks or stones after cleaning them with a scouring sponge if necessary.   5. Protect your grill from the elements Extend your barbecue’s shelf-life by keeping it covered with a heavy-duty, shaped cover that will keep it protected from all the elements. Choose the grill’s location so it isn’t under any drips or snow slides from the roof. This will also make the head chef’s life a lot nicer! If you don’t use your barbecue in winter, move it into a garage or shed.

How a security check can help reduce your vacation home insurance premium

Most insurance companies now require a signed report showing that an empty vacation home has been checked once or twice a month during the off-season.

Goldstar cleaning crews will combine their housekeeping visit with an insurance security check, and record the date, time, and results of their visit so you can send a clear record to your insurance company.

This means you get to enjoy your vacation time without worrying about cleaning – and it could save your house insurance premiums from rocketing if you need to claim repairs.

Security checklist

Goldstar cleaning crews routinely check for:

• Open or unlocked windows and doors all around the building

• Signs of an attempted break-in or vandalism

• Lights or appliances that have accidentally been left on, causing high energy bills and a risk of fire.

• Broken or incorrectly programmed heating systems, which could cause your pipes to freeze in winter

• Sounds or signs that there might be a water leak or damage

• Early signs of rodent or pest infestation

They also:

• Flush each toilet and scrub the water line to avoid build-up of limescale

• Check all lights to make sure no bulbs have blown

• Can carry out deep cleaning tasks, such as carpet or furniture steam cleaning

Potential damage

Goldstar owner Jill Barclay has seen firsthand the damage that can be caused by a small problem that is left unnoticed for weeks.

“I knew one client who started using our services after a pipe in their basement burst, causing thousands of dollars of damage.

“When they last visited the home it would only have been a small drip in the water filtration system that they didn’t notice, but during the summer the pipe burst, flooding the entire basement.

“Unfortunately because they hadn’t used any kind of security check contingency plan, the insurance was cancelled and they had to cover the huge cost of the damage themselves.”

Rental peace of mind 

When you rent out your vacation home, it’s particularly important to make sure everything is in good shape before your renters get there, says Jill.

“At another of our client’s homes, snow had piled up against a plexi glass barrier around the deck, causing it to shatter and making it unsafe to use.

“We came round to check the vacation home ahead of a rental, and were able to clean it up and get it replaced before the renters got there, which meant the owners didn’t have to cancel the booking or deal with poor reviews of their rental vacation home.”

Contact Goldstar now to arrange for a personalized quote to clean and check your home.

How to choose a cleaner?

Before hiring a cleaner, consider these questions to make sure you get the right service for your needs. • What is your realistic budget for cleaning? What are your expectations from a cleaning service? Ask them if they will draw up a cleaning checklist for your property so that everyone knows what the expectations are of the cleaner. Remember that weekly or biweekly, smaller cleans are more effective than a big monthly clean. • Do they carry out a realistic assessment of your requirements? A professional cleaning company like Goldstar Cleaning Services will always carry out an on site consultation before giving a quote for services, to find out exactly what your expectations are and to give a realistic idea of how long it will take, how many people will be needed and how much it will cost. • Do they have Worksafe BC coverage? When you hire someone to work in your home, even casually, you are considered a residential employer and could be liable to pay compensation costs and unpaid premiums if they injure themselves on your property. Established companies like Goldstar Cleaning Services ensure all employees have Worksafe BC coverage, but small operations may not have considered this. Find out more at Worksafe BC. • Are they bonded and insured? Do they have liability insurance to cover the cost of anything that may be damaged or stolen in your home or workplace? • How many people will clean your property at a time? Will it be the same team each time? What will happen if one of them is sick or on vacation – will the company organize another person to complete the service? • How much experience does the company and its employees have? If you have valuable furniture or equipment and unusual materials that will need to be cleaned, do they have experience and training on the best cleaning techniques? • Always ask for references and follow up on them • Do they supply all the equipment and cleaning products they will use? Is it important to you for them to use green products? Do you have allergies that they need to factor in? • What is their cancellation policy? • Do they have a quality assurance policy? How do you pay them? If you are not happy with the service they provide, can you speak directly to a supervisor?